A couple of weeks ago I had a presentation about ASP.NET 5 and MVC 6 at NNUG Oslo. The presentation wasn't recorded so I thought I just write some blog posts about it insted. This will be a serie of posts where I plan to go through the features that I demonstrated during the presentation, plus some more features that I didn't have time to cover. I'll start with the basic and show one thing at a time and then add features as we go along. So let's get started.
Post in this serie:
- The pipeline
- Adding MVC to an application
- Setting up frontend build (with grunt)
- IoC and dependency injection
- View Components
- Self-hosting the application
- Hosting your application in docker
Source code: https://github.com/mastoj/OneManBlog
Setting up self-hosting
In ASP.NET 5 you are more in charge of how you host the application. So far we've been using IIS (or IIS Express), but I thought I would show how easy it is to add self-hosting to the application. Self-hosting is great if you want to run it as a service instead of in IIS.
Updating project.json
The first step is to add two more packages we need to add:
Microsoft.AspNet.Hosting- the hosting infrastructureMicrosoft.AspNet.Server.WebListener- the self-hosted web server implementation for Windows
The dependencies node in the project.json file should now look like:
"dependencies": {
    "Microsoft.AspNet.Mvc": "6.0.0-beta4",
    "Microsoft.AspNet.Server.IIS": "1.0.0-beta4",
    "Microsoft.AspNet.StaticFiles": "1.0.0-beta4",
    "Microsoft.AspNet.Server.WebListener": "1.0.0-beta4",
    "Microsoft.AspNet.Hosting": "1.0.0-beta4"
},
The last thing we need to do is add a "command" to the commands node:
"commands": {
    "web": "Microsoft.AspNet.Hosting --server Microsoft.AspNet.Server.WebListener --server.urls http://localhost:5000"
},
After you added that you will get a new menu item under the debug button called web:
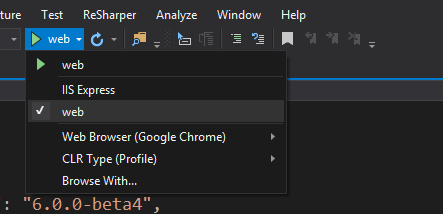
Choosing that menu item and start the application will start the self-hosted version instead of IIS Express.
DNVM, DNX and DNU
If you want to run this from the command line you first install DNVM. To install it you can follow the instructions here: https://github.com/aspnet/home#powershell. You use DNVM to manage which version of DNX and DNU you want to use. After DNVM you can run a command like:
dnvm use 1.0.0-beta4 -r coreclr -arch x64
This will select version 1.0.0-beta4 and the core runtime. When we have selected the version you can now use DNX to run the application from the command line with the following command:
dnx . web
Note that the command above only works is you are in the same folder as the project.json file and that web must match the name of the command in the project.json file. If you need to restore the packages you can run DNU before DNX:
dnu restore