A couple of weeks ago I had a presentation about ASP.NET 5 and MVC 6 at NNUG Oslo. The presentation wasn't recorded so I thought I just write some blog posts about it insted. This will be a serie of posts where I plan to go through the features that I demonstrated during the presentation, plus some more features that I didn't have time to cover. I'll start with the basic and show one thing at a time and then add features as we go along. So let's get started.
Post in this serie:
- The pipeline
- Adding MVC to an application
- Setting up frontend build (with grunt)
- IoC and dependency injection
- View Components
- Self-hosting the application
- Hosting your application in docker
Source code: https://github.com/mastoj/OneManBlog
Adding some functionality
Before we go on to the main purpose of this post, let's add some simple functionality to the application we're building.
Add an in-memory database
The goal of the application is a simple one man blog, so we need some kind of data storage. I settled on this simple model:
public class PostModel
{
    public string Slug { get; set; }
    public string Content { get; set; }
}
and with that I created this in-memory database:
public class Data
{
    private Dictionary<string, PostModel> _posts = new Dictionary<string, PostModel>();

    public void Add(PostModel post)
    {
        _posts.Add(post.Slug, post);
    }

    public PostModel Get(string id)
    {
        return _posts[id];
    }

    public IEnumerable<PostModel> GetPosts()
    {
        return _posts.Values;
    }
}
Updating the Home/Index view
The Index view of the Home controller will be where you enter the blog posts. After that you'll be redirected to the post. The updated view looks like:
<html>
<head>
    <title>
        Welcome to you!
    </title>
    <link href="/lib/bootstrap/css/bootstrap.css" rel="stylesheet" />
    <link href="/css/site.css" rel="stylesheet" />
</head>
<body>
    <div class="container">
        <h1>This is my new blog</h1>
        Hello from MVC NNUG! asdad sasdasdasd adasd asd sadsa

        @using (Html.BeginForm("Create", "Post", FormMethod.Post))
        {
            <div class="form-group">
                <label for="slug">Slug</label>
                <input type="text" name="slug" id="name" value="" class="form-control" />
            </div>
            <div class="form-group">
                <label for="content">Content</label>
                <textarea id="content" name="content" class="form-control"></textarea>
            </div>
            <input type="submit" value="Save" class="btn btn-default" />
        }
    </div>
    <script src="/lib/jquery/jquery.js"></script>
    <script src="/lib/bootstrap/js/bootstrap.js"></script>
</body>
</html>
Handling the posts
As you can see in the Index view there is a POST to the Create action in the Post controller. So let's add the controller:
[Route("[controller]")]
public class PostController : Controller
{
    public static Data _data = new Data();

    [Route("{slug}", Name = "GetPost")]
    public IActionResult Index(string slug)
    {
        return View(_data.Get(slug));
    }

    [Route("[action]")]
    public IActionResult Create(PostModel model)
    {
        _data.Add(model);
        return RedirectToAction("Index", new {slug = model.Slug});
    }
}
Creating the post view
The Create action results in a redirect to the Index action in the same controller, so we must add also add the view for the Index action:
@model OneManBlog.Model.PostModel

<html>
<head>
    <title>
        @Model.Slug
    </title>
    <link href="/lib/bootstrap/css/bootstrap.css" rel="stylesheet" />
    <link href="/css/site.css" rel="stylesheet" />
</head>
<body>
    <div class="container">
        <h1>@Model.Slug</h1>
        <div>@Model.Content</div>
    </div>
    <script src="/lib/jquery/jquery.js"></script>
    <script src="/lib/bootstrap/js/bootstrap.js"></script>
</body>
</html>
Notes about the application
I don't have error handling or anything like that since all I want to do is create a sample application to work with. As you can see in the views, there are references to jquery and bootstrap, but we haven't added that yet. So the next step is to add a frontend build process that handles all the frontend dependencies, it sounds more difficult than it is.
Adding the frontend dependencies
As you see in the markup above we need bootstrap to make it look prettier. So the next step is to add the script and css to the project. The way you are supposed to add frontend script to ASP.NET project in ASP.NET 5 is to use bower to add the frontend script. (The fact is that you can probably use whatever you want, but bower is integrated in VS15).
There is one simple step you need to do, and that is add a "bower.json" file. Note that you have "intellisense" in the file. The file should have the following content:
{
    "name": "OneManBlog",
    "private": true,
    "dependencies": {
        "bootstrap": "3.3.2"
    },
    "exportsOverride": {
        "bootstrap": {
            "js":  "dist/js/*.*",
            "css":  "dist/css/*.*",
            "fonts":  "dist/fonts/*.*"
        }
    }
}
You can read about the options here: http://bower.io/docs/creating-packages/. The exportsOverride defines how we want to extract the files from the package during build which will be describe in the next subsection.
If everything works as expected your solution explorer should look like this:
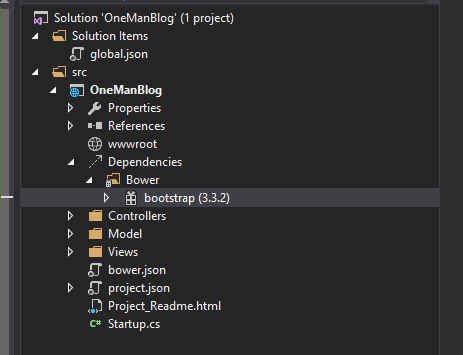
There you see bootstrap is installed in the project with version 3.3.2, and you can also see the dependencies for bootstrap if you click the small "arrow" left to bootstrap.
There has been some issues with the CTP version of Visual Studio and running the bower script. One issue that I had was due to git and a workaround can be found on Stack Overflow.
Adding frontend build dependencies
After you've added bootstrap you might get tempted to add a reference to the scripts and css files directly to where they are, but that is not the way you should do it. The way to serve static files in ASP.NET 5 is to move to static files to the wwwroot, the web root. You can see the web root in the picture above right under references. Moving files is a repetitive task that humans are generally fails to do over and over again, so instead we should set up a frontend build step. This is nothing new for the web community in general, but it has not been the recommended way to solve this before in the .NET community.
We are going to use gruntjs to do the actual frontend build, but this is pluggable and if you prefer to use gulpjs](http://gulpjs.com/) you can. All these tools run on nodejs, but everything is nicely integrated in Visual Studio so there are not that hard to get it up and running.
Adding grunt
To install grunt in the solution NPM is used, which is sort of the same thing as Nuget but for javascript packages. Also similar to bower, but bower targets mainly frontend frameworks. To add NPM packages we need to add a file "package.json" with the following content:
{
    "version": "0.0.0",
    "name": "",
    "devDependencies": {
        "grunt": "0.4.5",
        "grunt-bower-task": "0.4.0"
    }
}
The difference here compared to "bower.json" is that we use devDependencies and that is because gulp is used to build the frontend application and a dependency to the actual applicaiton. You can see that there are two packages included, one is the grunt package so we can run grunt and the second package is an extension for grunt to deal with bower packages.
The solution should now look like:
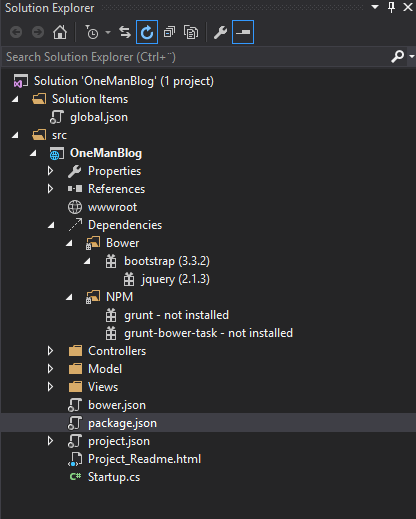
If it says "not installed" after the NPM packages you can just right click the NPM folder and select "Restore packages".
Configuring grunt
Now we have everything setup to configure the actual frontend build. The build is configured in the file "gruntfile.js" so that should be added to the solution with the following content:
module.exports = function (grunt) {
    grunt.initConfig({
        bower: {
            install: {
                options: {
                    targetDir: "wwwroot/lib",
                    layout: "byComponent",
                    cleanTargetDir: false
                }
            }
        }
    });
    grunt.registerTask("default", ["bower:install"]);
    grunt.loadNpmTasks("grunt-bower-task");
};
The grunt.initConfig is where we defined our front end build step. To be able to run the bower task we need to add a bower section to the config where we configure how to install bower. byComponent means that each component will get its own section in webroot. targetDir is simply the target folder when we move the files. grunt.registerTask is used to set up different tasks and alias for them so we can trigger different build task if we need to. grunt.loadNpmTasks is how we load the plugins.
The "Task Runner Explorer" window
To configure when and how this build is run we have a new View in Visual Studio. If you right click the "gruntfile.js" file you have an option called "Task Runner Explorer". If you open up the "Task Runner Explorer" you get a window that looks like:

There you can see all tasks defined in the "gruntfile.js" which you can run by right click the file and choose run. You can also bind the task to be run before or after a build for example. I like to have run the bower task after build so that's how I bind it usually. If you set up a binding you can see it under the binding tab. If you run the default task the solution view should be updated with content under the web root and it should look something like:

There you can see that all the bower packages, bootstrap and jquery which bootstrap depends on, are grouped by component as defined.
Setting up static file handling
If you try to run the solution as it is now it will look like nothing has happened. But that's because we haven't added support for static file handling and all the requests for the scripts and css will match hour "catch all" that will just output "Hello world!".
To solve that you need to do two things:
-
Add the static file handling package to your
project.jsonfile, making thedependenciessection look like:"dependencies": { "Microsoft.AspNet.Mvc": "6.0.0-beta4", "Microsoft.AspNet.Server.IIS": "1.0.0-beta4", "Microsoft.AspNet.StaticFiles": "1.0.0-beta4" }, -
Update the
Startupclass so static file handling is included in the pipeline:public class Startup { public void ConfigureServices(IServiceCollection services) { services.AddMvc(); } public void Configure(IApplicationBuilder app) { app.UseStaticFiles(); app.UseMvc(rb => { rb.MapRoute( name: "default", template: "{controller}/{action}/{id?}", defaults: new {controller = "Home", action = "Index"}); }); app.Use(async (context, next) => { await context.Response.WriteAsync("Hello world!"); }); } }
Summary
We now have the building blocks for adding basically any component we want to our frontend application. If we wanted to add less support we would just need to add the grunt-contrib-less package to our package.json file and update the gruntfile.js to compile the less files to css. That finishes this part blog post, next will be a little more about dependency injection.